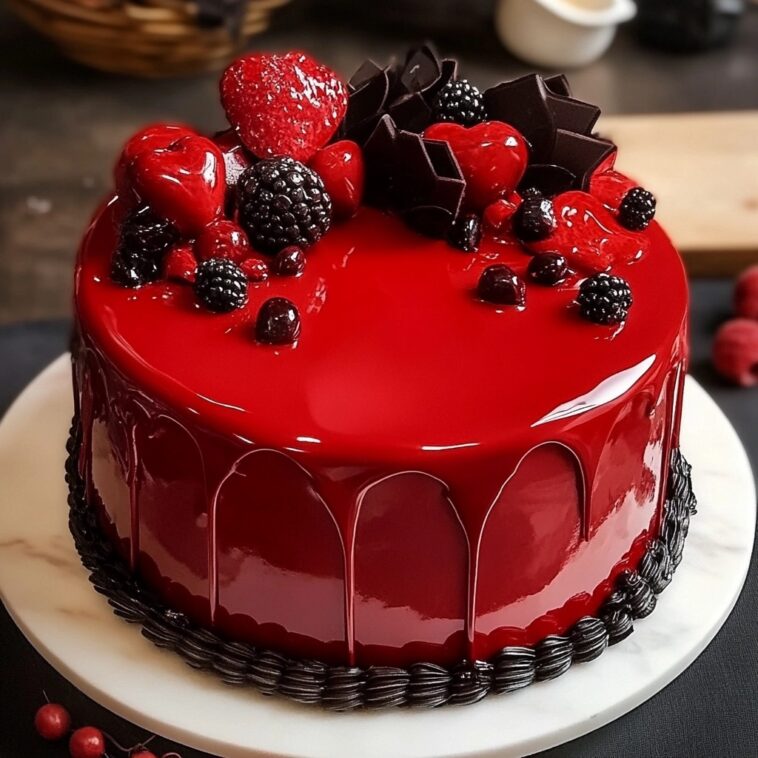
If you love the rich, velvety taste of red velvet desserts, then this Red Velvet Glaze is a must-try! It’s the perfect glossy topping to elevate cakes, cupcakes, donuts, or even cookies. This stunning glaze adds a mirror-like finish with a smooth, creamy texture and a hint of chocolate flavor that defines classic red velvet.
The Beauty of a Red Velvet Mirror Glaze
A red velvet glaze is more than just a topping—it’s an artistic touch that transforms an ordinary dessert into a showpiece. This glaze creates a smooth, glass-like coating that enhances both the appearance and flavor of your treats. The slight cocoa undertone, combined with the glossy red finish, makes it an eye-catching addition to any dessert.
Whether you’re preparing a Valentine’s Day cake, a festive holiday treat, or simply want to impress with a professional-looking finish, this red velvet mirror glaze is the way to go. Plus, it’s easier to make than you might think!
Ingredients for Red Velvet Glaze
Creating this stunning Red Velvet Glaze requires a handful of simple yet essential ingredients. Each component plays a crucial role in achieving the perfect smooth, glossy finish.
- White Chocolate – The base of the glaze, giving it a creamy texture and a rich taste that pairs beautifully with red velvet desserts.
- Sweetened Condensed Milk – Adds sweetness and helps create a silky consistency.
- Granulated Sugar – Helps stabilize the glaze and enhances its glossy effect.
- Unsweetened Cocoa Powder – A touch of cocoa gives the glaze its signature red velvet flavor.
- Gelatin Powder – Essential for achieving that mirror-like shine and ensuring the glaze sets properly.
- Water – Used to bloom the gelatin and dissolve the sugar for a smooth consistency.
- Red Gel Food Coloring – Provides the vibrant red color that makes this glaze visually stunning. Use high-quality gel coloring for the best results.
How to Make Red Velvet Glaze
Making a mirror glaze might seem intimidating, but by following these steps, you’ll achieve a flawless, professional-looking finish with ease!
Step 1: Prepare the Gelatin
In a small bowl, sprinkle the gelatin powder over cold water. Let it sit for a few minutes to bloom. This step ensures the gelatin dissolves evenly into the glaze.
Step 2: Heat the Liquid Ingredients
In a saucepan over medium heat, combine the sweetened condensed milk, granulated sugar, water, and cocoa powder. Stir continuously until the sugar dissolves and the mixture is smooth. Do not let it boil.
Step 3: Add the Chocolate
Remove the saucepan from heat and add the white chocolate, stirring until completely melted and smooth. This creates a rich, creamy base for the glaze.
Step 4: Incorporate the Gelatin
Add the bloomed gelatin into the warm mixture, stirring until fully dissolved. The gelatin is what gives the glaze its shiny, mirror-like finish.
Step 5: Add Red Coloring and Strain
Stir in red gel food coloring until you reach the desired vibrant red shade. For a smooth glaze, pour the mixture through a fine sieve to remove any lumps.
Step 6: Cool to the Right Temperature
Let the glaze cool to 90°F (32°C) before using. If it’s too hot, it will be too thin and won’t coat the cake properly. If it’s too cool, it will be too thick to pour smoothly.
Step 7: Pour Over Your Dessert
Place your chilled cake or dessert on a wire rack over a tray to catch excess glaze. Slowly pour the glaze over the center, letting it flow evenly down the sides. Let it set for a glossy, flawless finish.
How to Perfect Your Red Velvet Glaze
Achieving the perfect red velvet mirror glaze requires attention to detail. From the right temperature to the ideal pouring technique, here are some key factors to ensure success.
Best Temperature for Mirror Glaze
Temperature plays a crucial role in getting a smooth, flawless glaze. Here’s a general guide:
- Too Hot (Above 95°F/35°C) – The glaze will be too runny and may not coat the cake evenly.
- Too Cold (Below 85°F/29°C) – The glaze will be too thick and may not spread smoothly.
- Ideal Temperature (90°F/32°C) – The perfect consistency for a glossy, even coat.
How to Store Leftover Glaze
If you have extra glaze, don’t throw it away! You can store it and use it later.
- Refrigerator – Store in an airtight container for up to 1 week. Reheat gently to bring it back to pouring consistency.
- Freezer – The glaze can be frozen for up to 1 month. Thaw in the fridge overnight and reheat before use.
Tips for a Perfect Red Velvet Glaze
To make sure your mirror glaze turns out stunning every time, keep these tips in mind:
- Use High-Quality Gel Food Coloring – Liquid food coloring may thin out the glaze and affect its consistency. Gel food coloring gives a vibrant red hue without altering the texture.
- Chill Your Cake or Dessert – The glaze sets best on a cold surface. Make sure your cake is fully chilled or frozen before pouring.
- Strain the Glaze – For an ultra-smooth finish, strain the glaze through a fine mesh sieve before pouring. This removes any lumps or air bubbles.
- Work Quickly – Once the glaze reaches the right temperature, pour it immediately for a seamless, even coating.
Common Problems and Fixes
If your mirror glaze doesn’t turn out perfectly, here’s how to troubleshoot:
- Glaze is too thick? Reheat gently in the microwave or over a double boiler until it reaches the right temperature.
- Glaze is too thin? Let it cool slightly before pouring to thicken up.
- Bubbles in the glaze? Tap the bowl on the counter and use a spatula to remove air bubbles before pouring.
- Not sticking to the cake? Ensure the cake is very cold; a warm cake will cause the glaze to slide off.
With these tips, you’ll be able to create a stunning, glossy red velvet glaze that transforms any dessert into a masterpiece!
Print
Luxurious Red Velvet Glaze Recipe
- Total Time: 35 minutes
- Yield: Covers one 8-inch cake 1x
Description
This Red Velvet Mirror Glaze is the perfect finishing touch for cakes, cupcakes, and other desserts. It creates a stunning, glossy red coating with a subtle chocolate flavor, making your treats look as good as they taste. Whether for a special occasion or an elegant homemade dessert, this glaze will impress every time!
Ingredients
- 1 cup white chocolate chips
- ½ cup sweetened condensed milk
- ¾ cup granulated sugar
- ¼ cup unsweetened cocoa powder
- 2 ½ teaspoons gelatin powder
- ¼ cup cold water (for blooming gelatin)
- ½ cup warm water
- 1 teaspoon vanilla extract (optional)
- Red gel food coloring (as needed)
Instructions
- In a small bowl, bloom the gelatin by sprinkling it over ¼ cup cold water. Let it sit for about 5 minutes.
- In a saucepan over medium heat, combine condensed milk, sugar, warm water, and cocoa powder. Stir until sugar dissolves and mixture is smooth (do not boil).
- Remove from heat and add white chocolate, stirring until fully melted.
- Stir in the bloomed gelatin until completely dissolved.
- Add red gel food coloring until you achieve the desired color. Strain the glaze through a fine-mesh sieve for a smooth finish.
- Let the glaze cool to 90°F (32°C) before using. If it’s too hot, it will be too runny; if too cold, it will be too thick.
- Place your chilled cake or dessert on a wire rack over a baking tray. Slowly pour the glaze over the center, letting it flow evenly down the sides.
- Allow the glaze to set for 5-10 minutes, then carefully transfer the cake to a serving plate.
Notes
- For a shinier glaze, avoid over-stirring to prevent air bubbles.
- If the glaze thickens too much, reheat gently and stir until smooth.
- The glaze can be stored in the fridge for up to 1 week or frozen for 1 month. Reheat before use.
- Prep Time: 10 minutes
- Cooling: 15 minutes
- Cook Time: 10 minutes
- Category: Dessert Glaze

